Seen your friends rocking cool colored Snapchat icons and want to know how to change your Snap code too? Check out our complete tutorial on editing and customizing your personal Snapchat icon here.
So about a week ago I noticed a new trend with Snapchat users; suddenly a bunch of folks on my Twitter feed were rocking customized Snapcode icons. Instead of the standard bright and cheery yellow behind the Snapcode ghost with your profile picture inside, I started seeing blue, green, red and other colored Snapchat icons – some even had different kinds of text and other effects added.
If you’ve seen some of these custom Snapchat icons around yourself and want to change the color of your Snapcode too, then we’ve put together a simple tutorial to help you do that. The best part of all is, there’s a free tool you can use online to do it. Check it out!
How To Change Your Snapchat Icon Color And Other Snapcode Customizations
Step #1: Download Your Personal Snapcode
- On your computer visit www.snapchat.com
- At the bottom of the page under the “Community” heading, click on “Snapcodes.”
- Click the “Download Snapcode” button (you will need to login in with your Snapchat username and password to access your snap code.)
- Make sure you know where the folder downloaded because you will need to use a file inside it. The folder that downloads should be called “Snapcodes.”
Step #2: Customize Snapcode Color With Pixlr
- Go to Pixlr.com
- Scroll down the page and click on the “Pixlr Editor”
- Click on the “Open Image From Computer” option.
- Navigate to the place where you saved the Snapcode folder.
- Open the Snapcode folder and select “Snapcode.png.” This will place your personal snap code in the Pixlr editor
- On the left-hand side of the screen is a tool menu. Select the wand tool. Click inside the white ghost with the wand. The ghost should now have a moving outline.
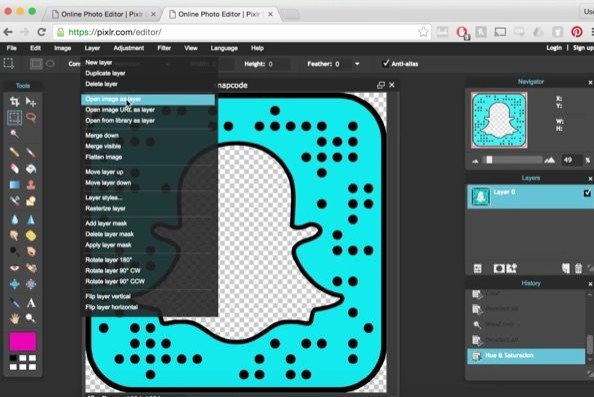
- Press the delete key on your computer or go to the “Edit” menu at the top of the screen and click on “Clear.” The Ghost should now be clear (gray checkered background)

Once you've cleared the inside of your Snapchat snap code ghost, it should be transparent (grey checkers) iDigitalTimes - Go back to the tools on the left and click on the dotted square “Select” tool (second down from the top on left).
- Now click somewhere in the yellow part of the snap code
- At the top of the page, go to the “Adjustment” menu. Click on “Hue and Saturation”

The Hue and Saturation tool will allow you to adjust the color of your snap code. iDigitalTimes - With the Hue, Saturation and Lightness bars, move them around to achieve the color you want (Ex: Changing color to Red requires tuning hue down to -41, saturation up to 100 and lightness down to -54)
- Press OK when you’ve achieved the color you want.
Step #3: Add a Custom Photo To Snapcode

- Go to ”Layer Menu at the top of the screen and click on “Open Image as Layer”
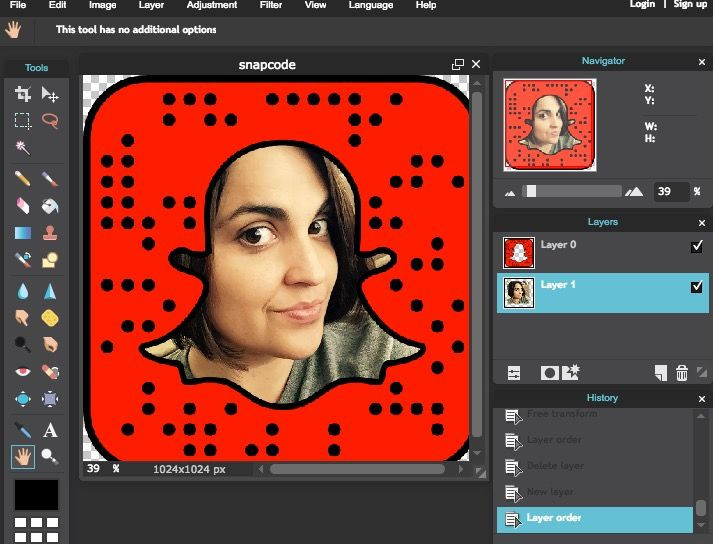
- Choose a picture on your computer that you want to use. It will show up on top of your snap code.
- If the size is not right, go to the “Edit” menu and select, “Free Transform.” You can now size the image by grabbing one of the corners and dragging in or out.
- Once the image is the proper size, go to the right-hand side of the screen. Your image should be a small icon called “Image 1.” Grab it and drag it under the snap code icon labeled “Image 0.” The image should now be layered under the snap code.
- Now go to the File menu and select “Save.” Save you edited snap code where you can find it.
- You can now send the edited snap code to friends or post it on your social media page!

If you have any trouble with the above instructions, check out the following video for extra help.


![[EG April 19] Best 'Stardew Valley' Mods That Will Change](https://d.player.one/en/full/226012/eg-april-19-best-stardew-valley-mods-that-will-change.png?w=380&h=275&f=955520b8313253ee3c39c791f6210f38)


